Pre Production.
The year 2015 stands as you might have guessed as the most technologically orientated year of all time, no surprises there. We live in an interconnected world, connected by the internet. Computer evolution has seen the development of high-tech hardwares and softwares that enable us to create just about anything on screen, and I am fortunate to have been granted access to equipment that has allowed my group and I to fulfil our vision.
The year 2015 stands as you might have guessed as the most technologically orientated year of all time, no surprises there. We live in an interconnected world, connected by the internet. Computer evolution has seen the development of high-tech hardwares and softwares that enable us to create just about anything on screen, and I am fortunate to have been granted access to equipment that has allowed my group and I to fulfil our vision.
From the very beginning of the development of our music video my and group and I have utilised various forms of digital technologies. During the brainstorming process of development my group and I used our phones to document our progress, taking pictures of the written work we had produced and sending them to one another via social media. This was extremely helpful for us as at that stage of development significantly communication was of upmost importance, and the sharing of new ideas was made far more quick and efficient through the use of online social media and the ability to document thought process visually through the use of our camera phones.


All photos above were documented on our Iphones
Once the initial brainstorming process was completed and the development of our final idea was underway the digital technologies that we have access to today continued to play a huge role in the efficiency of communication. An example of this is when we had to interact with students from my collage in the casting and organising of our first test shoot for our developed concept. We used the school intranet to get in touch with our potential actors/performers, sending group messages providing details for the shoot day which included what we wanted them to do, where we wanted them to be and at what time etc. As it is difficult to organise a group of teenagers to process was made far easier through the use of our school email accounts. As we awaited the scheduled day for the rough shoot we used our camera phones to document footage of our performers rehearsing their roles, practicing with their instruments, learning the track etc. Not only was this good for providing evidence for our coursework but also it gave us an opportunity to see what our performers were like on camera, which was good because if a performer didn't suit the look we were going for on camera and we didn't know until our test video then we would have been in a little bit of a situation.

The First Test Shoot.
The first test video itself was a success in my eyes, as it gave us an idea of what worked and what didn't in our concept, what we needed to add in order for it to be made more interesting for the viewer and what visually didn't link to the overarching genre conventions of our chosen track and the look we were aiming to create. I filmed the video on my Iphone, which proved to be a quick and convenient way of shooting decent quality footage for our rough test shoot. As we hadn't tested the concept visually prior to this it would have been a waste of time to use better, more expensive equipment, so the Iphone proved to be a good choice of camera for this shoot. As the for the camera maneuverability, the iphone was small and easy to operate. I was able to get in really close without having to exert too much effort when filming Ollie as the dancer, and quickly shifting position to get another angle was easy with such a small camera which meant I could capture each of the three performance elements in one take. I was able to play the track out loud on an Ipod whilst filming simultaneously which meant that even though it was a rough shoot of our concept, the performers were able to keep in time fairly well which made the editing process much faster.
In the edit I used the editing software Adobe Premiere pro cc 14 which I had installed on my laptop. My understanding of editing was good as I had had a lot of practice shooting and editing short films and advertisements, however I had never edited a music video before, so even the editing of this first test video proved to be educational for me. I only had a handful of shots to choose from for this test video as I had asked each of the performers to do their best so that I could capture them in one take seeing as at this point in the school term we were all very pushed for time - another benefit to the convenient auto-exposing, auto-focusing Iphone we had used to film it. Due to the fact that there were only few shots to choose from I was able to edit this first test video within a couple of hours.
At this stage I was unfamiliar with the concept of cutting to the beat, I simply cut on significant changes in the track or when I felt a shot had lasted too long - this proved to be ineffective as I have explained in my evaluation of Test Video 2 evaluation. Despite this I feel it was valuable to have had a rough test video before a slightly more professional and advanced test video to scope out exactly what we needed for the final video.
A couple of weeks passed after the completion of our first test video, we found that our group was to shoot our music video fairly late on and that we had a little extra time to shoot another test video, which would prove to be invaluable over the coming weeks. We again used the school emailing system to communicate with our performers/actors, this time the process was far more in depth as this second shoot required more actors and back up dancers than the first shoot, which only included three performers. As there were so many actors needed we had to make sure that we didn't miss anybody out of the group messages that contained key details, and we had to ensure that the actors/performers had all read their emails and knew where they were meant to be, which in some cases meant we had to message them through social networks as teenagers have the tendency to look at their social media more than their school email...which is understandable.


The Second Test Shoot.
I used a Canon 7D mk 2 to film the second test video, as this was a massive jump in technology compared to the iphone 6, and we felt that we needed to not only use the correct actors, but to shoot them on a more professional recording device in order to again get an idea of how the actors/ set worked visually, and to also get used to how different lenses made the subject look, and how the perspectives of different focal lengths differ significantly from one another. We used two lenses in this shoot, a 17-40mm EF L Canon lens, and a 70-300mm EF L Canon lens when shooting this test video, using the wide angle predominantly for the group shots of the rowdy boys bouncing around and for shooting both drummers (we didn't use this footage in the end), and used the zoom lens for shooting the close ups of the drums, singer, and drummer.

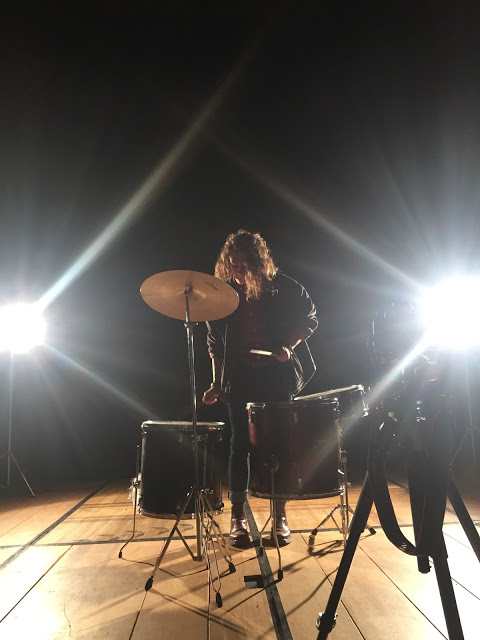


I filmed the drumming sequences predominantly on a tripod, as to get a steady shot and to solidify a few shots that I could cut back to if the handheld shots were too scruffy in places. I did shoot a couple of handheld takes of the drummer in order to create a more dynamic sequence in the edit, as steady, tripod shots can become boring to watch for the viewer. All of the takes of "the grimy boys" were handheld as we wanted the atmosphere of this element to be chaotic and energetic, reflecting the nature of the angst culture amidst the social context of our chosen track. I got in close to the dancers and moved the camera in a pulsating motion, moving to the beat of the song which in the edit would amplify the rhythm of the track. The use of basic studio lighting meant that I could keep the ISO fairly low (as it was a DSLR camera, different to the Sony fs-100 where the ISO equivalent would be low, medium, or high gain) even with the aperture at f7 in order to have all 10 of the dancers in focus. If it wasn't for the first test shoot I wouldn't have been a little more familiar with the style in which we chose to shoot our video.
As for the edit of the second test shoot I had a slightly better idea of how to edit a music video than before, I still hadn't fully grasped the concept of cutting to the beat, or at least I didn't understand that our track in particular required many MANY cuts in order to match the intensity and pace of the song. My editing style changed only a little from the first test video, but in this edit I tried experimenting with various different editing techniques that added a more interesting dynamic to the video, seeing if I might stumble across something that could work really well in the final version of our music video. One technique that I found really quite interesting was a sort of strobe effect that I engineered by zooming right into a clip on the editing timeline, then cutting the clip every 0.03 seconds before deleting every other tiny clip - which therefore creates a flashing effect. When these clips are placed over the top of another, un-fragmented clip the effect is really visual and bold, you see both clips simultaneously as they flash, this works best i've found with one stable shot and one handheld shot with a lot of movement.


The Official Video.
The day of our official shoot came about 2 weeks after the second test video was completed, the step up from wobbling around with a 7d to having to operate the sony fs-100 with multiple prime lenses was quite significant. There was little skill required even for my second test shoot, as again we were pushed for time - on the shoot day however we had plenty of time, so we could afford to have our performers perform multiple takes which allowed me to be more creative on the camera. Noticeably in the video I jerk the camera erratically whilst it's on a tripod, I loosened the head to give myself more freedom and fluidity when filming. I would have one hand on the handle of the tripod, and one on the focus ring on the prime lens - I jolted the tripod head, holding it steady on various parts of our skinhead performer's body, constantly focus hunting to create that panicky, chaotic vibe we were going for. Another thing that worked really well due to the manipulation of modern digital technologies was when I jolted the camera heavily at a specific point where i'd directed our singer to move dramatically in a downward motion, I followed that motion with the camera - I then used the same technique for our drummer at the same point in the track which meant that in the edit I was able to cut from the singer to the drummer in the split second where the screen is a dark blur - creating a seamless, unnoticeable cut that worked really effectively with the track.


The video was composed of a variety of different camera techniques: locked off wide shots, shot on the 25mm prime in order for me to have a solid, reliable shots to cut back to in the edit if all other shots weren’t good enough for that particular moment in the track, loose head tripod shots with hunting focus and fully handheld shots for getting in close to the singer in both the tunnel and the studio, capturing different angles of the studio that i would get if I stayed on the tripod on the open side of the set - I used a 50mm prime for these shots as the 50mm is the most diverse lens in my opinion. I set the fs-100’s shutter speed to 350, which was arguably the most discreet technique I used to make the video feel a lot more chaotic - as with a faster shutter speed the viewer subconsciously feels more uncomfortable than if the piece of film was shot using a slow shutter speed - this technique worked extremely effectively when coupled with the strobe lighting, the aggressive nature of the track, and the jolting camera and focus.
I edited the video using Adobe Premiere pro cc 15, which was a nice step up from Adobe Premiere pro cc 14 as the layout is much more user friendly and there is a significant difference in the colour grading department.
Despite wanting the video to pack a punch in the nightmarishly chaotic department I did need to break the video up with slower sections in order to allow the viewer to recover from the barrage of borderline epileptic sequences to make them more impactful throughout the video - as the viewer can become accustomed to the incredibly fast pace. I did this by slowing down the movement of the camera and significantly extending the shot duration of the shots of our singer. Not only did this provide a rest for our viewer’s eyes, but it also satisfied the would be needs of the imaginary record label that would be attached to the band - they would want the lead singer to be seen on screen as much as possible in order to promote their brand, so if I maintained the fast paced cutting to the beat style editing during the lip-sync you wouldn’t be able to concentrate on the deliberately attractive singer’s features, and would therefore not be able to associate her face with the image of the band. As I mentioned in the previous point, I edited the footage to the beat of the track, cutting on the pulsating beat and when I heard points (of which there were many) where it felt right to cut. This technique emphasised the beat of the track, and therefore made the video more engaging for the viewer.
Due to the lack of narrative in the video I was able to utilise discontinuity editing on multiple occasions, for example when I screen mirrored the two locked off wide shots of our drummer, creating the illusion of two of the same person being present in the frame at the same moment in time, This process was very simple, I placed one shot over another on the editing timeline, cropping the shot over the top so that both drummers can be seen. This was possible without showing any tell-tale editing signs by positioning the drummer and his drum set on opposite sides of the frame so that they didn’t overlap, and by keeping the camera and tripod in the exact same place for both shots, so that their environment remained unchanged after the crop. To enable myself to edit in this combined shot quickly and efficiently I nested the two shots to create one clip that I could manipulate on the timeline. Another form of discontinuity editing that I used in the editing process of the video was the looping of shots in one part of the video. This is where I cut and copied the same short snippet of a clip and placed the copied shot directly next to the original 5 or 6 times to create a glitch-like effect, which contributed to the technological vibe of the video that is established by the electronic sound of the track, and the dystopian looking performers we chose to feature in the video. This use of discontinuity editing made the video more visually engaging for the audience and adds a little something extra to the video overall.


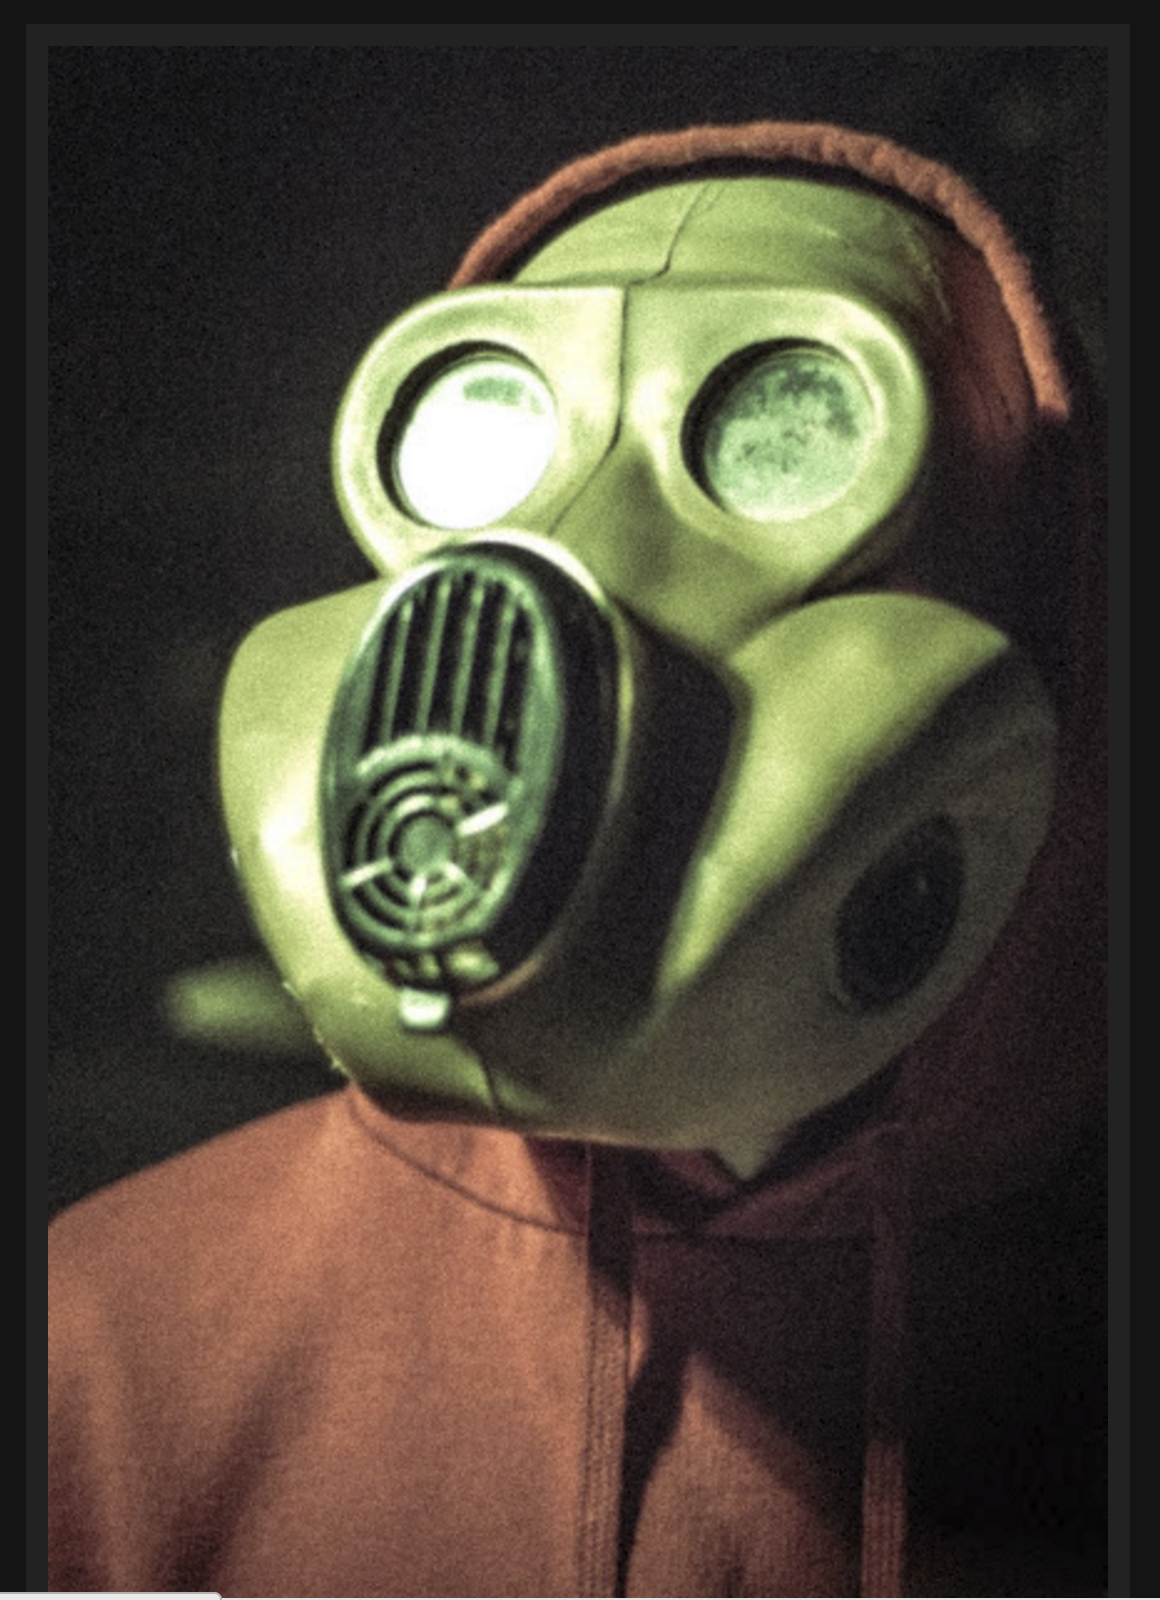
As for the offline editing, we wanted to add something extra to the video - a wow moment, something that would make the viewer jump. We chose to use the adobe post production software After Effects to morph/distort our skinhead dancer's facial features to make him more alien-like and to emulate our video's overarching technological nightmare theme. I think this effect was extremely effective and gave the video another element that engages the viewer.


As for the offline editing, we wanted to add something extra to the video - a wow moment, something that would make the viewer jump. We chose to use the adobe post production software After Effects to morph/distort our skinhead dancer's facial features to make him more alien-like and to emulate our video's overarching technological nightmare theme. I think this effect was extremely effective and gave the video another element that engages the viewer.


The colour grade was an important feature of the video, I have had a lot of experience in colour grading so this was an enjoyable process of the edit for me. The studio lighting used on the day created quite a naturally warm grade, which contrasted the vibe of our video as a warm grade gives connotations of comfort and pleasure - so the first thing that I did was use Adobe curves in the colour section of adobe premiere, selecting the red curve. I then reduced the saturation of red's in the shadows, which automatically increases the saturation of blues, making the video much colder and therefore adhering to the theme of our video, creating an uninhabitable looking environment. Saturating the blues, increasing the exposure of the highlights and decreasing the exposure of the shadows also emphasises the strobe lighting, which proved to be extremely effective and made the video a lot more punchy and impactful. By decreasing the exposure of the shadows I created a much darker environment which expresses evil, ominous connotations - supporting the nightmarish quality of the video.


The Digipak. As for the development of our digipak, I have learnt a lot about the digital photo editing and manipulation software Adobe Photoshop. However due to the fact that my delegated responsibility within the group was to edit our video, I have not developed as great of an understanding of this technology as I have with the Adobe film editing and manipulation softwares.

We took the photos of our model, who we chose to be the male dancer in the video as we wanted to promote the brand of the band - spreading his image across two products to reinforce the band image. The dancer represents the essence of the band, angst, aggression, supernatural.
The next step in the process was to edit and layer multiple images of the model, creating a hallucination effect, which connotes recreational drug use. The genre of our band is electronic rock, and it is well known that generally the audience of this genre indulge in explicit substances during concerts as has been seen frequently. Therefore the album/digipak design plays toward this stereotype, aiming to appeal to a wide spread audience of electronic rock.

The process of layering consists of layering one photo on top of another in photoshop, then lowering the opacity of the two photos on the top of the stack. After doing this we resized the now faded layers so that the three images of our model overlapped, creating that hallucination effect we were after. We changed the colour of two of the images to reinforce the colour hue in the video, to again spread the image of our band across as many platforms as possible in order to promote the brand.

We then came up with a series of fictional names to tracks that aurally fitted the genre (nasty is another track on the prodigy's album The day is my enemy) We then scaled and coloured the text and overlaid it onto the images of our model.
Without the use of digital technology it would have been extremely difficult to produce a good digipak that suited the style we were going for.
The Website.
The Creation of the website has been a big learning opportunity for me to learn my way around website building softwares which I'm sure will become a useful skill in the not too distant future. The website creators I am familiar with now after the production of our products are Wix and Wordpress, but we only used Wix to build our website.
Similarly with the digipak, my level of understanding of website building software isn't up to the standard of my film editing and manipulation software understanding.